Monday, December 28, 2009

Oh Holy Night...


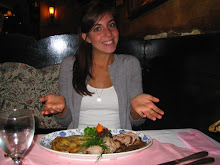
Christmas has come and gone, which is always a sad reality. However, it doesn't feel like that this year, since it never really came and thus never truly went! I am still humming away to "Rockin' around the Christmas Tree" (the Brenda Lee version of course) and sucking away on my candy canes. In any event, Elsa and some friends and I managed to bring together a lovely Christmas Eve meal that was both festive and brought friends together in the way I love around christmas time.On the menu:
Roasted Asparagus - lightly drizzled with Oliv
e oil, salt and pepper
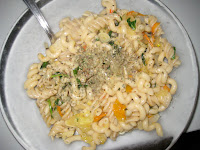
Sauteed Potatoes with Thyme, Olive oil and S & P
Guacamole - not truly fitting I know, but definitely Delicious :)
Pan fried Kebabs with Onions, Garlic and Mushrooms

Dessert:
Bananas, Frozen Blueberries, Strawberries, Apples dipped
in melted white and Milk chocolate
And of course, lots of wine - we know that Red wine would have gone better with the meat, but my French roommate doesn't drink red wine, can you believe it?? I know, she must not truly be Parisian!
The Potatoes were a recipe from France that Elsa brought to us and they were cooked as followed:
Cut as many potatoes as you like into small 1 inch cubes - the more uniform the pieces the more even the cooking process
Through them into a screaming hot pan layered with Olive Oil - or Butter :)
When the potatoes being to brown, add sliced onions and garlic - being careful not to burn, easily burnable garlic
This takes a fairly long time, I would say about 30 minutes, until the potatoes have cooked, and become nice and crispy
About 5 minutes before the Tatters are finished, add a handful or two, however much you like of S &P, and fresh Th
yme.
Serve HOT and Enjoy! :)

These turned out so nicely, and very crisp and satisfying!!

The fruit with the melted chocolate was just to die for, Now I am allergic to milk chocolate, but white chocolate is ok since it really isn't chocolate at
all, and just a synthetic sub
stitute - but a delicious s
ynthetic substitute, of which I ate far too much. We melted the white/milk chocolate chips just in two coffee mugs in the microwave, which, I know, sounds totally déclassé, but it was easy and worked like a charm. The only tip I have for
this process is to be VERY careful not to burn the chocolate, because it is VERY easy to do, and burnt chocolate tastes just as awful as burnt ga
rlic -bitter, sour and just awful, which is why true chocolate melters use a double boiler, but oh well there was no burnt chocolate for us!!
The dinner was lovely, felt very festive and satisfied my need for familial bonding and overindulgent eating that, to me, go hand in hand with Christmas. Finally, when I went to my brothers the next day to celebrate his wife's 40th birthday party, low-and-behold, he had found me a LARGE (over 6 feet!!!) christmas tree which he had adorned so sweetly with lights and a lovely hand made stand. I was so touched. So, all in all, my Holy Land Christmas turned out quite nicely, and I learned that although it wasn't the same as the christmas I am used to at home, as long as I made sure that I ate well, spent time with family and friends, and kept the Christmas tunes blaring, I wasn't missing much :)

Sunday, December 20, 2009

Cookies fit for an Officer...


*sigh* The weekend draws to a close once again, which is a tragedy because I just have so much school work these days since the semester is coming to a close, and somehow I managed to do absolutely none of it!
Anyhow, I baked the "better-than-brownie-Cookies" on thursday night, and although I couldn't taste them, since I'm allergic to almost every ingredient in them, my audience (before the boy came on Friday) said that they were good, but could be better! This was to my dismay, since Yair (the Boy) has been eating Tuna in the desert for the last two weeks, the idea of serving him sub-par cookies devastated me! Anyhow, they assured me that it wasn't that they were not good, it was that the cocoa powder had added to bitter of a texture, and that perhaps they would have been better with a little less. I ended up not using the brownie-cookie recipe I had planned to based on
the fact that I had hoped to use cocoa powder, as I wanted to have them as chocolatey as possible, and it was an ingredient that I had never used before and I wanted to try it!
In the end, I decided just to use a regular chocolate cookie recipe that included cocoa powder, nuts and chocolate chips.
Here is the Recipe
I used:

1 1/2 cups all purpose flour
1/4 cup unsweetened cocoa powder
1 teaspoon baking soda1/4 teaspoon salt
1/2 cup unsalted butter, softened
1 cup granulated sugar
1 teaspoon vanilla extract
2 large eggs
1/2 cup dark chocolate chips, melted, plus an additional 1/4 cup
2/3 cup coarsely chopped toasted salted cashews
2/3 cup coarsely chopped Oreos
1/2 cup M&M's
* I didn't add Oreos, or salted cash
ews, OR m&m's for that matter! Instead, I added dark chocolate chips, white chocolate chips and Smartie
s and chopped almond slivers. Of course, the added goodies are whatever suit your taste.

Preheat oven to 350 degrees F. Coat cookie sheets with cooking spray.

In a medium sized bowl, sift together flour, cocoa powder, baking soda and salt. In a large bowl, using a mixer on medium speed, beat together butter and sugar until creamy, about 1 minute. Beat in vanilla and eggs until combined, about 1 minute; beat in melted chocolate chips until combined. Reduce mixer speed to lo
w and beat in flour mixture until combined. Stir in remaining 1/4 cup chocolate chips, cashews, Oreos, and M&M's until combined.

Drop heaping tablespoons of dough onto cookie sheets, about an inch apart. Bake 12-13 minutes or until set. Cool 2 minutes before transferring cookies to wire racks to cool completely.
Makes about 2 1/2 dozen
Now, Yair said that they were good and compared to canned tuna they tasted like heaven which was a relief:) However! making these cookies, taught me a very valuable le
sson - You know how usually a recipe will tell you "refrigerate for at least 3 hours", well I've always thought that that was a waste of time and not an important aspect of the recipe WELL, it turns out it is.
My second batch of cookies taught me this - the second round of cookies I made were regular chocolate chip cookies, but I added white chocolate chips, dark and a few mini chocolate bars - I baked one round without refrigerating the dough and it was a liquidy disaster! They tasted nice apparently, and yet they didn't look like cookies, they looked like sheets of golden brown dough with
chocolate chips! Then, I placed the rest of the dough in the fridge for about and hour and Voila! They came out perfect, golden brown, fluffy, soft chocolate cookies! SO bakers all over the world - let it be said here first, that refrigerating dough is REALLY important!!
Here is the Recipe for Round Two of the cookies:

3 1/3 cups all-purpose flour

3/4 teaspoon baking soda

1/2 teaspoon salt

16 tablespoons (2 sticks) unsalted butter, melted and cooled

1 1/4 cups packed light brown sugar

1/2 cup granulated sugar

2 large eggs

2 large egg yolks

1 tablespoon vanilla extract

12 ounces semisweet chocolate chips (2 cups)

Preheat the oven to 160 degreeC (or 325degreeF). Whisk flour, baking soda and salt in a bowl. Then beat the butter and sugars until combined. Add the eggs, yolks and vanilla. Scrap down the bowl as needed. Reduce your mixer speed to low and mix in the flour slowly, around 30 seconds. Mix in chocolate chips until incorporated. Chill the batter for at least 30minutes so that it's easier to scoop them. Scoop them into balls on a baking sheet/aluminium. Bake for 17-20 minutes

These cookies are probably the most beautiful ones I've ever made I was really proud of them, and He loved them and by the end of the weekend I managed to send him to the base a) looking like this:

and b) with two large containers of Delicious cookies, which made me feel very accomplished!
Tonight, I am off to a family friends for dinner, where they will present me with the Candycanes they brought me from Toronto!! Thank goodness!! Finally! A little taste of the christmas spirit I have so missed!!

Wednesday, December 16, 2009

The Day of Starch...


Today's weather was very strange. Sunny, and yet dark that is nonsensical I realize that but I have no better way to describe it!! It was sort of damp and yet chilly all at once. Anyhow, I've recently realized that the weather really effects what I want to eat and how I cook. Today all I wanted was carbs, carbs, carbs, carbs , carbs! Which generally isn't what I crave.

Anyhow, I made myself Rice pasta (since I can't eat Gluten)
for lunch with just olive oil, dried basil and salt and pepper
- it was simple, but warm and comforting and totally hit the spot. However, it didn't seem to satisfy me so, what did I make for dinner? MORE rice pasta.

For dinner however, it was much more sophisticated. I decided to make a light tomato sauce with Yellow cherry tomatoes (I'm allergic to red tomatoes), lots and lots of fresh garlic, onions and Fresh Basil which happens to be one of my favourite ingredients.
Here is How I made the Sauce:
-15 Yellow Cherry Tomatoes
-1 tbsp of Olive Oil
-4 Large Cloves of Garlic
-1 Whole medium white onion
-a handful of Fresh basil (I cut the leaves instead of slicing them, giving it a more rustic look)
-Saute the onions and garlic in the Olive Oil until they are soft
- Add the tomatoes and half of the Basil - Along with Salt, Pepper and dried basil to taste
- Cook until the tomatoes have created a sauce in the pan (you can add a tablespoon of pasta water if it's not saucey enough for you - BUT only a tablespoon at a time, you don't want it to be runny and flavourless)
- Toss with cooked Pasta!
Et Voila!
I boiled the pasta in some salty water until it was tender; this may seem like an easy task, however rice pasta is difficult to cook because undercooked it's very hard and chewy,
and overcooked even by the slightest amount it gets mushy and awful and the line between those two options is very thin.
This is a really great method for making
fresh tomato pasta sauces because the tomatoes sort of melt away leaving their bitter skins separate from their sweet juice making a really flavourful sauce. I also added a fair amount of dry basil, because I think it tastes really different from the fresh stuff, and I love them together!
basil, and let me tell you! This round of pasta REALLY hit the spot! I was completely satiated :)

Well, Tomorrow is the day that I attempt to make brownies for the boy. Now, because I don't have any brownie pan per se, so I am going to attempt to make brownie cookies which I think will be divine.
Thursday tomorrow! Thank Goodness, it's felt like a long week, despite the fact that 4 of my classes were cancelled and I probably could have got a tan on Tuesday. Ahhh the hard life :)

Tuesday, December 15, 2009

Beets and Leeks and Beans Oh My!


I have been having some issues with my roommates and the fact that two of them (not my roommate Elsa) but the others, their lack of care for the lack of toilet paper, and the quickly accumulating dirty dishes. After a long and stressful day, seeing no toilet paper in the bathroom again after about a week and a half of promising ourselves (Elsa and I) that we would not buy toilet paper AGAIN since it is their turn, I found myself at the grocery store trying to decide between two ply or three! It felt wrong and incredibly annoying. SO I figured that tonight would be a night for a culinary challenge that would both calm me and energize me.

Tonight was the night that I decided to cook Beets!
Which proved to both calm me and energize me like I had hoped! Now I have been having misgivings about cooking them because they simply take FOREVER! and also they stain everything, and without a washer or dryer and only my brothers who live an hour away to help me with my laundry woes, it becomes more of a life choice than simply a dinner choice! :)
Anyhow, I braved it tonight, along with my wonderful roommates boiled Leeks, and let me tell you, I feel absolutely ridiculous for not attempting them sooner!! The way I would normally think to cook beets is to boil them for 5 million years in boiling, salty water until they are fork tender. However, Victoria informed me that I should bake them in my miracle Toaster oven wrapped in tin foil and with Olive oil, Salt and Pepper.

I followed her directions to a T, well, almost - Since moving to Israel the pounds have seemed to have packed on, so I followed her directions sans the Olive Oil. They took FOREVER as I thought they would but it was worth it - the tin foil kept them amazingly moist and the skin was super easy to peal off, and they were perfectly tender. And as it turns out, the lack of Olive Oil did not leave me wanting, which was a pleasant surprise.

I paired them with my roommate Elsa's boiled leeks,
which sounds strange perhaps but they are divine - soft, slightly oniony but also mild in the best way. Along with black beans, yellow tomatoes, orange peppers, fresh leaves of cilantro and basil and my beets of course, I made a great salad with just a simple dressing of olive oil, Balsamic vinegar and salt and pepper!!

While this may not seem like a culinary feat, the successful cooking of the beets in the toaster oven truly feels like a great success!! And just another reason for why this oven has changed my life only for the better :)


Sunday, December 13, 2009

Salmon Sunday, etc.


The date is December 13, 2009, in Tel Aviv today it is 20 degrees celsius which is ludicrous, since I am a Toronto girl, used to -21 degree weather at this time of year, so it is a big adjustment! It's been a good weekend, I got my nose pierced and spent a few hours colouring in Christmas themed colouring pages in an attempt to birth some christmas spirit among the sunshine and palm trees *sigh*, it's hard to believe I am craving cold weather and snow!

Today, despite the pleasant weat
her, I was craving comfort food of some sort, and I thought why not attempt a baked salmon? I was feeling extra brave today since the stuffed peppers with rice and vegetables, and the brown sugar and cinnamon baked apples worked just smashingly the night before! (Due to a copious amount of wine drinking, post baking, I didn't take pictures, Oops! I'll be more diligent in the future :) )

Anyhow, the salmon was baked in the toasted oven with a Lime, Hon
ey and Soya Sauce glaze, and it was so delicious! Now, it cooked for a little longer than the recipe calls for, so it took a few attempts at taking the fish out, cutting it open and putting it back in - but by the end it was tender and juicy, and not too fishy, which is always the worry!
Along side that, I made Roasted garlic (roasted also in the magic toaster oven!!) smashed potatoes, without any butter, cream, or anything - they were also fabulous with just a bit of salt and pepper and dried basil to taste. All in all it was a wonderful meal, just as comforting as I had hoped! :) I've finished the weekend on a high note, ready and waiting to see what culinary adventures the week brings me.

I've found myself a boyfriend here, in my 7
month stay; He is an officer in the army, and as you can imagine, he doesn't get much delicious food, and so one of my enjoyments is to bake/cook him large amounts of something to take back to the base for him and his fellow off
icers. He comes to my apartment this thursday and I've promised him brownies - Hopefully I can find a perfect recipe!

Lime, Honey Glazed Salmon
Serves 2:

juice of one lime

zest of one lime

1 tablespoon honey

2 tablespoons chopped cilantro

1 tablespoon soy sauce

1/2 tablespoon olive oil

1 medium shallot, diced

5 oz dry white rice (long grain/jasmine/basmati)

1 2/3 cup chicken stock

2 5-oz salmon fillets

Preheat oven to 450F

Mix together lime juice, zest, honey, cilantro and soy sauce. Place the salmon fillets in the marinade and set aside.

Bake for 6- 8 Minutes, until tender, and slightly soft and bright pink in the center

* In my toaster oven it took more like 15 minutes


Roasted Garlic Smashed Potatoes:
There was no real recipe for this, simply seasoned to taste:
Serves 2:
4 Large Yukon Gold Potatoes (or any other potato of your choice, a startchy one works best)
1 Tablespoon of Olive Oil
Dash of Dried Basil
LOTS of Salt and Pepper (of course to taste)

First Blog Post!


Welcome Blog Followers!
First of all, thanks for coming and checking out my blog, I hope that I can entertain with my kitchen challenges and mishaps (of which there seem to be many...Always!)

I moved to Israel in July to being my year abroad, and although I have always known that Food styling and culinary school were in my future, I think the new foods, new smells and new colours made me realize how truly passionate I am about food!

My Kitchen could be worse, it's fairly sizable, and yet I share it with three other girls, who thankfully, are fairly clean. We have a stove top (that's right no Oven, a real real tragedy) a Microwave, and now, a New and blessed addition, is our toaster oven. I have made such wonderful things with this small oven in the last two weeks that's it's hard for me to remember how I survived without it!

The first thing I new that I would have to experiment with is Baking; Another addition to my cooking challenges are my many many Allergies.

Here is a list of allergies so that the ingredients to some of my recipes don't seem Odd:
Gluten intolerant, dairy intolerant, all nuts (Not Peanuts, as they are legumes :) ) all seeds, coconut, tomato, and here is the kicker - Chocolate.

So, the first challenge I presented myself with was "Olde Fashioned Sugar Cookies" - Here is the recipe:

Sugar Cookies
Yields: 2 dozen

2 cups granulated sugar*
2 1/2 cups all-purpose flour
1/2 tsp baking powder
1/2 tsp salt
14 Tbsp (1 3/4 sticks) unsalted butter, softened
1 Tbsp vanilla extract
2 large eggs

Adjust oven rack to middle position and heat oven to 350°F. Spread 1/2 cup of the sugar* in a shallow dish for coating and set aside. In a separate bowl, whisk the flour, baking powder, and salt together and set aside.

Beat the butter and remaining 1 1/2 cups sugar together in a large bowl using an electric mixer on medium speed until light and fluffy, 3-6 minutes. Beat in the vanilla, then the eggs, one at a time, until combined, about 30 seconds, scraping down the bowl & beaters as needed.

Reduce the mixer speed to low and slowly mix in the flour mixture until combined, about 30 seconds. Give the dough a final stir with a rubber spatula to make sure dough is combined.

Line large baking sheets with parchment paper. Using wet palms, roll 2 Tablespoons of dough at a time into balls, then roll in sugar to coat. Place balls on parchment-lined baking sheets, spaced 2 inches apart. Flatten cookies with the buttered bottom of a drinking glass, then sprinkle and remaining sugar over flattened tops.

Bake cookies, one sheet at a time, until the edges are set and just beginning to brown but the centers are still soft and puffy, 10-12 minutes, rotating the baking sheet halfway through baking. Allow cookies to cook on baking sheet for 10 minutes, then serve warm or transfer to a wire rack and let cool completely.

* I substituted the 2 cups of Granulated Sugar, for 1.5 cups of packed dark brown sugar - making them extra chewy! :)

Now, being someone who celebrates Christmas, and living in Israel means the Festive Spirit is non existent, because I have been missing the festivities so terribly, christmas themed Sugar cookies were in order. The toaster oven proved 100% and a lot of fun!! The cooking time and temperature proved the same as on a regular oven, and they turned out perfectly crispy and brown on the outside, soft and pillowy on the inside - due to my allergies, and the fact that the cookies contained both butter and flour, I never tasted them, but my friends and roommates enjoyed them thoroughly.
I have taken the liberty of photographing my kitchen, and my fridge sharing among 4 women, so that you can truly understand my hardships
Another aspect of this blog is that I intend to add the Recipes, or a link to the recipe of all the meals I share on my blog!
Again, thanks for checking out my blog! And happy reading!